Introduction
Due to their extreme adaptability, blenders are perfect for usage in a variety of food retail and hospitality industries. They may be used to make a variety of culinary and drink products, such as batter, dough, sauces, dips, soups, and cocktails. The kitchen and lab appliance known as a blender is used to mix, compress, purée, or emulsify food and other material (also known as a mixer or liquidizer in British English). A stationary blender consists of an electric motor installed at the bottom of a blender container with a rotating metal blade. Some powerful versions may also smash the ice and other frozen foods. Let us continue reading this article to know more about the creative ways of using blenders including how to incorporate them when serving snacks.
Uses of a Blender for Cooking
Making homemade sauces and dressings
1. Classic vinaigrette
Choosing the Oil. To prepare your vinaigrette, use any palatable oil. This may be a pricey extra-virgin olive oil you just bought at the farmers market or a mild-flavored oil. Any oil that stays liquid at room temperature can be used.
Choosing the Vinegar. Experimenting with intriguing new vinegar tastes that you discover may also be enjoyable. Once more, if you like the flavor, it probably makes a nice vinaigrette. Simply stay away from distilled white vinegar. Its flavor is quite strong and abrasive, which makes it typically bad for vinaigrettes. Emulsifying is the process of mixing oil and vinegar, so they bond together to form a mixture that is virtually creamy.
To mix, use a blender or an immersion blender. Making a vinaigrette with chunky components like fruit or garlic; the blender fully incorporates these elements and produces a very smooth vinaigrette. What to do? Use an immersion blender or a blender to combine the vinaigrette’s components. Blend the vinaigrette until it is well-combined and smooth. Use the vinaigrette as soon as possible since a blended vinaigrette will still gradually revert to its layers.
2. Chimichurri sauce
The herbs, jalapeno, red pepper flakes, garlic, half the oil, 3/4 teaspoon salt, and 1/4 teaspoon pepper should all be combined in a blender. Purée, pausing sometimes to scrape the container’s sides if required. The remaining oil should be added gradually.
If you want the sauce to be thinner, add a little water after adding the vinegar and blending for one second. Serve immediately after tasting and, if needed, season with salt and pepper.
3. Hollandaise sauce
Melt the butter. Butter should be properly melted in a small pan. You want the butter’s moisture to stay in the butter and not steam out, so try not to let it boil.
Blend the egg yolks until lightened. Combine the egg yolks, lemon juice, cayenne (if using), and 1/4 teaspoon of salt in your blender. The egg yolk mixture has to be mixed for 30 seconds at medium-high speed, or until the color lightens. Blend for the whole 30 seconds while using a timer or counting aloud. The sauce gains more body after this stage.
Slowly add the butter. To make it simple to pour a narrow stream, transfer the melted butter to a glass measuring cup with a spout. Remove the blender lid’s plug. lower the blender’s speed (if you only have one speed on your blender, it will still work). Add the melted butter gradually while the blender is running.
Season to taste. Taste the sauce after turning off the blender. It ought to have a buttery, citrusy, and barely salty flavor. You can add a bit of extra lemon juice or the leftover salt to taste if it is not sufficiently salty or lemony.
Making soup
Creamy soups
Blend sturdier ingredients and liquid base. The components you will be using for your soup, including the frozen peas, green onion, salt, pepper, and avocado, should be added to the blender’s jar along with broth (which should be warm but not boiling hot). Secure the cover, then begin mixing slowly before accelerating. For around five minutes, blend. As a general guideline, combine your liquid base and more substantial components first before adding your more delicate herbs or other soft ingredients. Alternatively, you may add the items to the saucepan used to produce the vegetable broth if you are using an immersion blender. Make sure the blades are completely submerged before starting the blender and blend until the desired consistency is reached.
Add herbs and remaining ingredients. Lemon juice and mint should be added to the blender container once your mixture appears to be properly blended. Until you get a smooth and creamy consistency, pulse for 10 to 20 seconds.
Serve and enjoy. The soup needs to be served hot. But if you want your soup hotter and do not have a blender with a Thermal Control Jar, you may heat it on the stove until it reaches the temperature you like. Add any garnishes, such as sour cream, plain yogurt, and fresh mint swirl, to the soup before plating it. Enjoy!
Chunky soups
Combine all ingredients in the blender pitcher with the cover on, excluding the cilantro and lime.
Making beverages
Smoothies
To make mixing easy on the blades, liquids go in first. The addition of greens will aid in their effortless pulverization. Fresh fruit and soft vegetables are added next to assist the blades begin mixing. Frozen fruit and solid vegetables are the last items to be added.
Milkshakes
Ice Cream. Choose your preferred ice cream flavor for the base since this will serve as the foundation for the milkshake’s flavor.
Milk. We will need 1 cup of milk to thin down every 3 scoops of ice cream. Simply said, this is how a milkshake is made. It is similar to sipping ice cream, really.
Flavor. This might contain anything from frozen fruit, cookie crumbs, or baked pie crust to malted milk powder to enhance the vanilla flavor or micro chocolate chips for a chocolate milkshake.
Toppings. Without the addition of whipped cream and a cherry, it truly would not be a milkshake.
Making milkshakes is as easy as combining 3 scoops of ice cream with 1 cup of milk. You are free to add whatever else you wish!
The 1 cup of milk should be added to a tidy blender. The liquid should be added last since it is closest to the blender’s blades and will speed up the process of pureeing everything.
Over the milk, place 3 scoops of ice cream.
Any extra flavorings, such as chocolate syrup, micro chocolate chips, crushed cookies, frozen fruit, or cooked pie pieces, should be added at this point (for a cherry pie milkshake).
Cocktails
In a blender, combine the bourbon, fresh peaches, lime juice, and ginger beer. Starting on the lowest setting and working your way up to the highest level, add ice and combine. If you want a thicker consistency, add additional ice. If you have copper mugs, use these to pour the frozen peach bourbon mule; if not, any cocktail glass will do. Lime wheels and new mint sprigs should be used as a garnish.
Uses of a Blender for Baking
Making batters
Method
STEP 1. Place ingredients into the 700ml single-serve cup in the order listed.
STEP 2. Choose BLEND.
STEP 3. blades from the cup, remove.
STEP 4. Over medium heat, preheat the frying pan. Apply some oiled paper or spray to the area.
STEP 5. Pour a little amount of batter into the pan and swirl it around to cover the surface fully. Cook the bottom until it turns golden brown, and the top begins to bubble.
STEP 6. Cook the other side by turning it over with a palette knife. Use the leftover batter to repeat.
STEP 7. Add sugar and a squeeze of lemon before serving.
Waffle batter
All ingredients should be combined in a blender, starting with the wet ingredients. Once everything is well combined and smooth, pour the mixture into a bowl and set aside for about 10 minutes while the waffle iron heats up.
On your waffle iron, cook the waffles in accordance with the manufacturer’s directions; then, as you prepare the next batch, let them cool on a wire rack.
Making doughs
Pizza dough
Prepare the dough. Start by combining yeast, warm water, and sugar in your stand mixer bowl. Use your 6-Wire Whip Attachment to whisk the ingredients together, then set aside for a while. Salt and flour should then be added to your mixing bowl. When the ingredients are thoroughly blended, attach the beater blade and mix on low speed. Next, add a little olive oil and beat again until incorporated. The dough should be blended, kneaded, proofed, and then punched to release air bubbles. When you peel out a little piece of dough, you should notice small strings of dough, which indicate that the dough has been thoroughly kneaded. In order to give the dough time to rest after kneading, it is advisable to begin proving in the refrigerator.
Stretch and shape the pizza dough. Stretching and shaping the dough once it has reached room temperature is recommended. With your hands or a rolling pin, carefully press the dough into a disk on a surface that has been lightly greased. The dough should be stretched out and shaped into a circle after being placed on a pizza pan.
Add toppings and bake. Add your choice of pizza toppings once the dough has been rolled out to the desired size. Traditional toppings like red sauce, mozzarella, pepperoni, or sausage are OK, but you can also get creative by adding prosciutto, figs, and goat cheese, or barbecued chicken and cheddar. Before serving, let your pizza cool after baking it for 12 to 15 minutes.
Bread dough
To start, dissolve yeast in a glass of warm water or milk, about 6 tablespoons, and add 1 teaspoon of sugar or jaggery. Mix well, cover, and leave away.
All-purpose flour, salt, milk powder, dates syrup, and active yeast should then be added to the blender jar.
To thoroughly incorporate the ingredients, give them a quick pulse. Add water to the jar as needed to create a sticky dough; do not add all of it at once.
Cover and quickly pulse the jar, then open it to witness the dough developing. It seems like a sticky mass, but do not worry, it will soon come together.
Add the oil or soft butter now, cover, and pulse only once more to ensure the dough is now a rough ball in the center. You will notice that a smooth dough ball is developing, pushing away from the jar’s side, and moving toward the center.
To create a ball in the center of the blender, pulse the food two more times, or as necessary. Now, open the jar and remove the smooth, malleable, non-sticky dough to a work surface by peeling away from the jar’s edges.
Now, all we have to do is fold and press the dough two or three times to form it into a smooth ball.
Keep this dough ball in a greased basin, cover it, and let it prove for an hour or until it has doubled in size.
Once the dough has doubled after an hour, remove the clingwrap, pull the dough out of the bowl, drop it back in, and repeat it a few times.
For the second cold proving, which will last 8 hours or overnight, cover the dough and place it in the refrigerator. and trust me, this is what gives the bread roll or buns their exceptional texture.
After the second proof, take the dough out and cut off the pieces needed to make the individual chocolate chip buns.
Recycle any leftover dough in the refrigerator for future use. Spread the chocolate chips or use Nutella spread, stretch the dough into a log, shape it into a bun, and set it on an oiled baking pan. Cover it and let the dough balls rise as directed.
This might take up to 30 minutes. Preheat the oven to 180 C, brush the bun tops with milk, and bake for 25 to 30 minutes, or until done. Timing may change.
Take the buns out and let them cool on a rack before eating.
Pie crusts
Butter, sugar, salt, and flour should all be added to your blender. Pulse the mixture 10–12 times until it resembles coarse crumbs. Add vinegar and water. Replace the lid and hold it in place while pressing “Pulse” 8–10 times until dough forms, twisting the lid counterclockwise while mixing. Take the dough out and shape it into a disc. Before spreading out the dough, cover the disc in plastic wrap and chill for at least two hours.
Making desserts
Cheesecake filling
Preheat oven to 350. Make sure your springform pan is correctly aligned and that it firmly shuts when you snap the ring shut. Spray a 10″ springform pan with PAM. Wrap the bottom and up the edges of the outside of the pan with a square of aluminum foil.
For the crust, sift together flour, baking powder, and sugar.
Slightly beat the egg.
Melted butter, an egg, and flour are combined. Stir everything together.
In the pan that has been prepared, press the mixture into the bottom and slightly up the edges.
Blend the cream cheese, flour, 2 eggs, sugar, and milk together to make the cheesecake. 3 minutes on high in the processor. No, this recipe does not contain vanilla. honestly and honestly!
For 55 to 60 minutes, bake (longer, if you use a 9″ springform pan). After cooling, remove the springform pan.
If desired, top with fruit while serving.
Fruit sorbet
Blend all the ingredients in a blender until they are completely smooth. Serve right away or transfer to a container suitable for freezing and harden in the freezer for several hours. Before serving, take it out of the freezer and let it a few minutes to soften.
Pudding
Blend eggs in a blender for 2 to 3 minutes.
Salt and flour should be combined in a bowl. Blend the flour mixture for approximately a minute, adding 1/4 cup of milk halfway through. Blend for a further 2 to 3 minutes, scraping down the sides of the blender, as necessary. Add the remaining 3/4 cup of milk and the batter.
Before cooking, chill the batter for one to two hours. Set the oven to 450 degrees Fahrenheit (230 degrees C). In a 12-cup muffin pan, distribute the meat drippings among six muffin cups. The muffin pan should be heated in the preheating oven until the drippings are extremely hot.
Take the pan out of the oven. Overheated beef drippings pour the batter.
Bake for 20 to 30 minutes in a preheated oven, or until puffy and gently browned.
Blender Cleaning and Maintenance
It is probably also the last thing you want to do when you’re rushing around trying to get your day started. But cleaning your blender pitcher after each use is important so that old food smells do not settle into the plastic.
Make sure the voltage power matches the one shown on the appliance nameplate before usage.
Avoid letting the rope dangle over the edge of the counter or table.
Never use an appliance that has been malfunctioning or has been damaged in any way, or that has a damaged cable or plug. To have the appliance inspected, fixed, or adjusted, bring it back to the closest authorized service location.
To prevent human injury or additional product damage, the manufacturer, its service representative, or a trained individual in the field of electronics must replace the supply cable if it is damaged.
If the youngster or children are under the age of 16, adult supervision is required.
Handle blender blades carefully because they are often SHARP.
Use of any attachments or parts other than those included with the blender or those the manufacturer has advised might result in a fire, an electric shock, or other harm.
The blender should not be used to mix dry, hard substances since doing so might damage the blade.
Before handling any moving parts of the blender, turn it off.
The Motor Unit should not be submerged in liquids.
Blenders should not be used by anybody, including minors, who has diminished physical, sensory, or mental capacities or who lacks experience and expertise, unless that person is being watched over or receiving training from a person who is responsible for their safety.
To prevent them from playing with the device, children should be watched closely.
Blenders should not be used outside.
To prevent any potential harm, caution must be used when handling the SHARP cutting blades, emptying the blender jar, and cleaning.
A lot of blender lids are split into two parts. To find out if yours does, consult your owner’s handbook. Separately clean the two parts after taking them apart. Any food that has gotten lodged will be removed from the lid’s crevices.
Dishwasher cleaning can etch, and damage blenders made of glass and plastic. The quickest and safest method to maintain your blender clean and presentable is to wash it by hand.
Food odors have a tendency to linger in blenders. Avoid it by not putting things in the blender. Mix equal volumes of baking soda and water in the blender if it has a bad scent. After five to ten minutes, let the solution sit in the blender before washing as usual.
Fill the jar halfway with equal quantities of white vinegar and water to clean a blender with vinegar for tough stains or smells. The blender should then be run for 30 seconds with the lid on. Completely rinse after emptying.
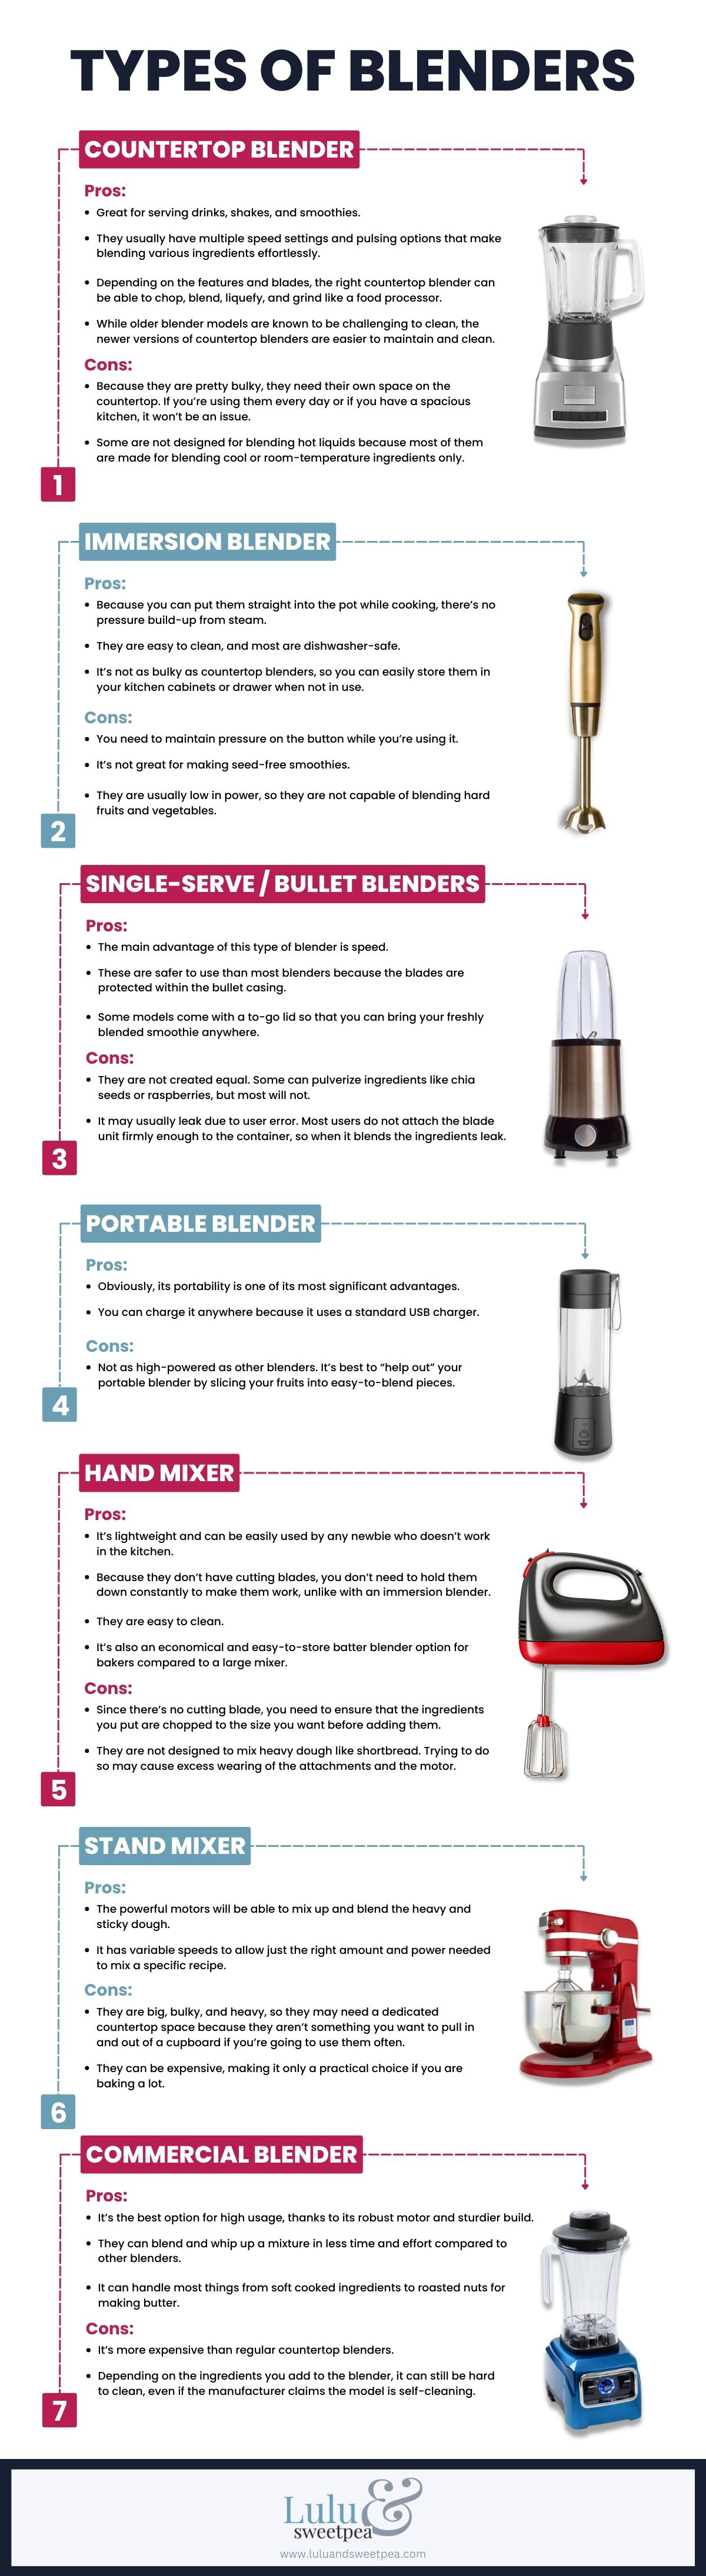
There are various types of blenders available in the market today. You can view the graphic below to learn more about them:
Conclusion
To guarantee safe and effective operation, it is crucial to confirm that your tool has been built correctly. Remember that as ingredients tend to rise when combined, make sure the lid is on and leave enough room in the container. It is important to make sure that the appliance is kept out of the reach of youngsters in order to prevent mishaps because it has features like a sharp blade and an electric plug. Enjoy using your blenders!