
What is Latte Art?
Latte art is a technique for making coffee that involves adding micro foam to an espresso shot to create a pattern or design on the top of the latte. It can also be made or decorated by merely “drawing” in the foam’s top layer. Due to the strict requirements placed on the espresso shot and milk, latte art is extremely challenging to produce consistently. The quality of the espresso machine and the barista’s experience both have a limit on this. The term is often used to describe various drinks with milk foam, like cappuccino and hot chocolate.
History of Latte Art
The early 1980s are the beginning of the very brief but intriguing history of latte art. It is said to have started in Seattle, Washington, during the 1980s coffee boom, when baristas began experimenting with the way their beverages were presented.
Simple shapes like hearts, leaves, and tulips were the original types of latte art, and they were made by adding heated milk to espresso and manipulating the froth with a spoon. These patterns soon gained acceptance in coffee shops and started to represent the talent and originality of baristas.
In the late 1980s and early 1990s, latte art started to acquire popularity in Australia, where it was further developed and improved. Baristas in Australia began to experiment with more sophisticated designs, such as swans and rosettas and started to utilize specialist latte art instruments to make more detailed patterns.
The 2000s saw a continuous rise in latte art’s popularity as coffee shops all around the world adopted the style. The inaugural World Latte Art Championship took place in Switzerland in 2005, bringing baristas from all over the world together to compete and display their abilities.
Since then, the competition has expanded in scope and appeal, and competitions are currently held in several nations. Baristas are continuously pushing the boundaries of what is possible, which has led to increased invention and development of latte art as a result of the competition.
Nowadays, latte art is not just a lovely complement to a cup of coffee but also a monument to the expertise and passion of the baristas who produce it. Latte art has developed from its modest beginnings in the 1980s into a global phenomenon that never ceases to excite.
How to Do Latte Art
It takes some practice to master the specific technique of latte art. To create latte art at home, follow these steps:
- Make your espresso. Create an espresso shot and pour it into a mug with a beautiful layer of crema.
- Prepare the milk. Pour enough cold milk into a small pitcher to fill your coffee mug. The best milk is one with a high-fat content.
- Heat the steam wand. Just below the milk’s surface, insert the wand into the pitcher. Make sure the steam wand’s tip stays about a centimeter away from the milk’s surface as it rises.
- Heat the milk. The milk should be heated until it begins to foam and steam. Put the wand into the milk when it has risen by about 30% so that it swirls counterclockwise in the pitcher like a whirlpool. This will produce micro foam by combining the foam and milk. Till the milk reaches a temperature of 150 degrees Fahrenheit, keep the wand in the pitcher.
- Turn the steam off. Your machine’s steam wand should be disconnected before being taken out of the pitcher. After cleaning the pitcher, turn on the steam wand to blow any leftover milk out.
- Tap the pitcher. Give the pitcher a tap against the counter to pop any huge bubbles. The steaming milk ought to resemble melted ice cream or wet paint and be thick with little foam bubbles.
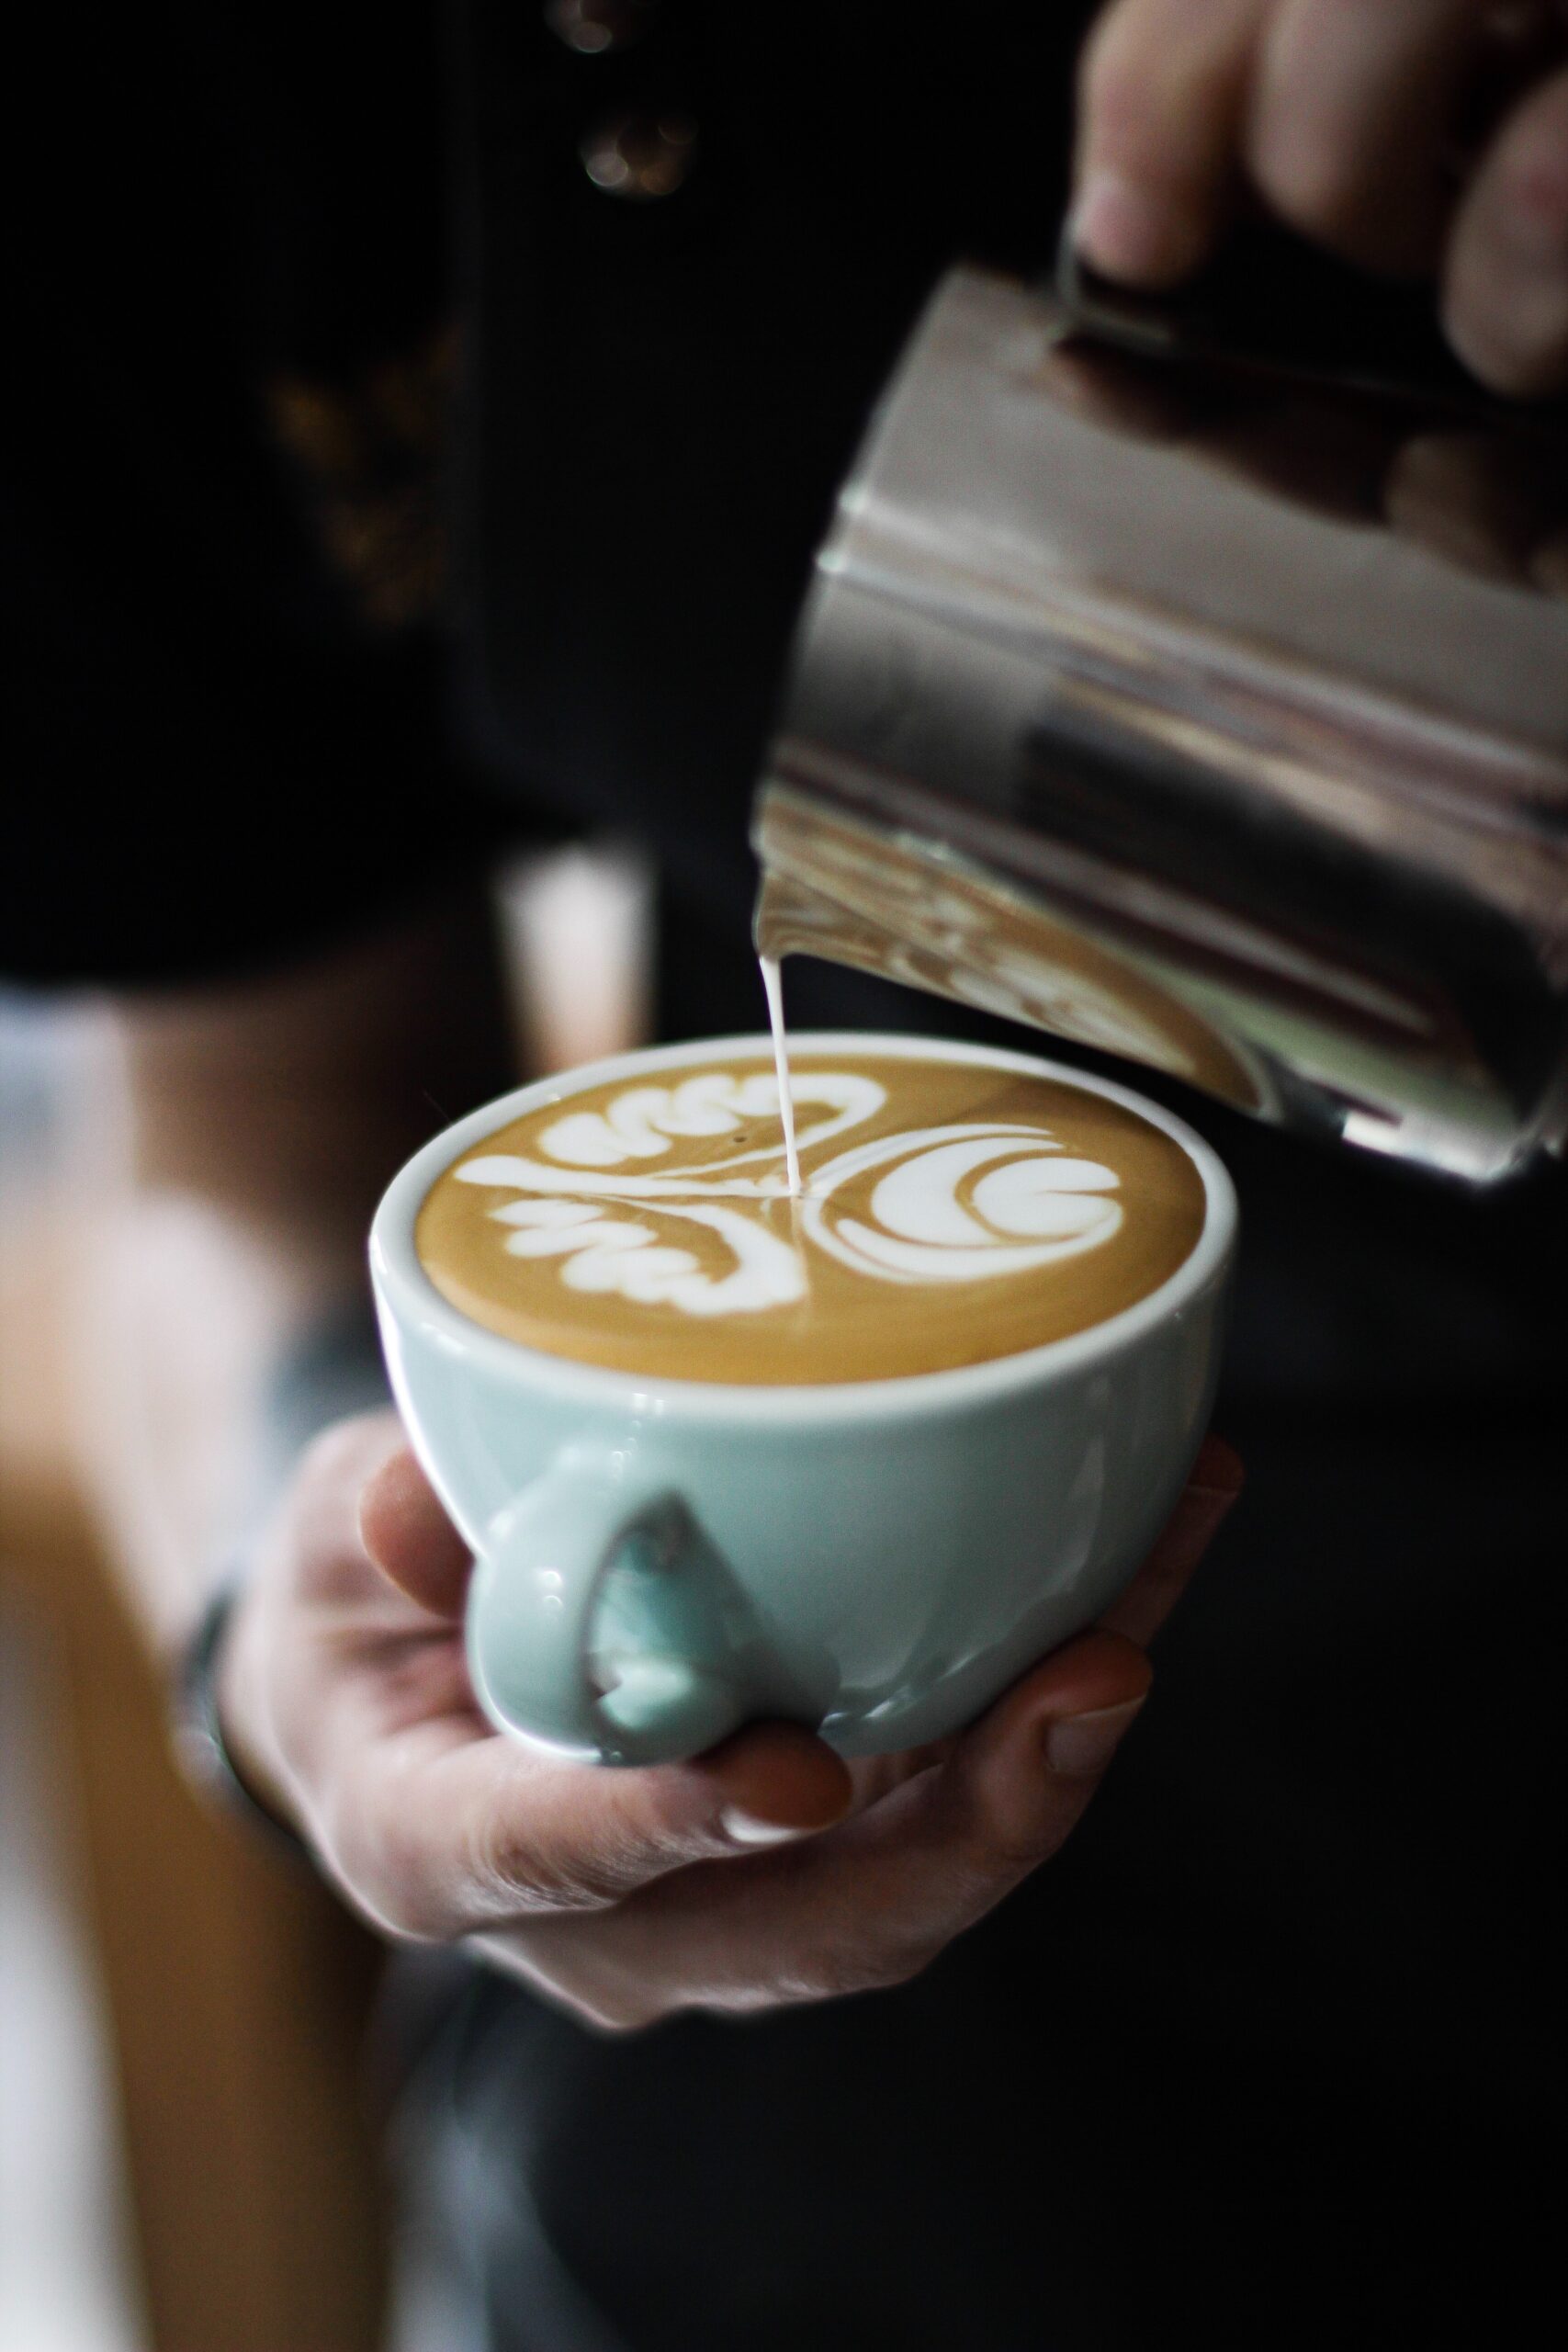
- Pour the milk. Hold the milk pitcher a few inches away from the espresso mug at a 45-degree angle. Fill the cup halfway with the foamed milk. Making ensuring the milk goes beneath the crema requires pouring from a modest distance.
- Lower the pitcher. Straighten out the cup after lowering the pitcher spout to its surface.
- Create a heart shape. To make a heart, pour milk into the cup until it is nearly three-quarters full. Lower the pitcher to the surface of the cup and then pour the foam into it in a circular motion. Pour the milk quickly in a straight line toward the heart in order to complete it.
- You might also form a flower. An alternative is to form a rosette of flowers. Pour the milk into the cup about an inch from the edge. When the mug is approximately halfway full, bring the pitcher closer to the surface. Wiggle the mug from side to side with your wrist as you are pouring the foam. The flower pattern will be created by this motion.
Tips For Pouring Latte Art
- Pour the milk slowly but steadily. Pouring too slowly will leave too much froth behind and pouring too quickly will shatter the crema.
- Invest in good foam. Latte art relies on the quality of the foam. Whole milk, which contains the greatest milk fat, produces the best foam. Moreover, you may produce latte art with high-fat non-dairy milk like oat milk.
- Establish proper consistency. To get silky foam, practice might be necessary. You want the milk to be frothy and thick but also pourable. The bubbles in your froth may be too large if your milk is a foamy clump. If your milk does not look thick enough, steam it for longer.
- Use tools and finishes. Using toothpicks, chocolate syrup, or cocoa powder, you can add more designs to the latte foam after you have poured the latte art.
- Develop your abilities. It takes some practice to make flawless latte art. As you master the fundamental latte art shapes, you can advance your skills to produce more complex forms, such as animals.
Latte art is difficult and the pain is real. That said and done, if you are here, you’ve probably scaled through the first basic latte art designs and you are looking for many advanced designs. In this article, I would be highlighting 7 Advanced Latte Arts for Coffee. Get your cups, jugs, frothed milk, and coffee as I walk you through them in a few steps. Also, check Great Coffee Brewers for great espresso machines at affordable prices.
Seven Advanced Latte Art for Coffee
Apart from the tulip, Rosetta and heat, you probably yearn for more as that creative barista that you are. In the Latte art game, a lot of creative designs have spiked up and if you want to keep your friends, family or customers impressed, you’re going to have to leave your comfort zone and delve into much difficult- advanced designs. Below, are seven picked Latte art designs for you;
Wheat Spike
This later art design is a personal favorite. To make this design, you would require as much concentration as you can muster. It’s okay if you fail at it multiple times, no one gets good overnight.
The trick to this is to wiggle the frothed milk in an ongoing s pattern and then drag the milk through it in half. You could go as many times as the cup allows.
Snowflake
This design is a little more than just frothed milk. To create this, pour your frothed milk in a close circle until the cup is full. After this, take a teaspoon, scoop some milk, and place it in the middle of the cup. Once done, define the circle using chocolate syrup and then create a smaller circle within the defined circle. Highlight with a skewer and then make more layers using the same method.
Rosetta
The Rosetta will always be a hit, but there are many advanced ways of making one other than three layers, go for more, seven to ten layers. It may take time to master, but the results are well worth it.
Swan
For this design, pour the frothed milk as though you are making a wheat spike, but rather than going through it, create a line right next to it and then drip some frothed milk next to the line for the swan head.
Written word
Another impressive latte art rage is the art of writing messages so coffee, either the owner’s name or good morning, an apology, or even an I love you!
Sunflower
To ace this design, firstly create a base with the frothed milk as you would be doing a lot of skewer work. Pour the milk in circles for a while, stop and then create the work area; a blurb of white milk. Using a skewer, create the finishing touches.
Rose
To create this design, first, create the base, then instead of stopping, your right through until you see the contrast. When you do, create a rippled base. After this, put a stick in the middle to spread the base out. Then, create the leaves to the rose by pouring in an interwoven manner then slit it through till the stack.
Once done with this, create your petals based on how much space you have left.
Summing it up!
Latte art is a creative and entertaining way to give your morning coffee some flair. Everyone can learn how to make beautiful designs on top of their coffee with a little practice and effort. Always start with the fundamentals, utilize premium products, and practice until you get it perfect. Happy pouring!